
# Integration Manager Controller
INTEGRATION API EXTEND INTEGRATIONThe Fluent Forms IntegrationManagerController Class provides developers with a very easy & simple solution to add new integration in a time effective way. Follow this documentation to create your own Integration.
You just need to provide your Integration settings data structure and the fields will be automatically generated for you. Please check this Integration Feed – Fields API (opens new window) for the available input component that you can use for your integration settings.
You can extend this class to create your own Integration. Include the class using the following namespace.
use FluentForm\App\Http\Controllers\IntegrationManagerController;
This class file location: fluentform/app/Http/Controllers/IntegrationManagerController.php
# Methods
__construct()getGlobalFields()getGlobalSettings()saveGlobalSettings()pushIntegration()getIntegrationDefaults()getSettingsFields()getMergeFields()notify()
# __construct()
This is the construct method of this class. This method needs to override. You have to pass an Application object and a few others required parameters. To pass Application object you can include it using the following namespace
use FluentForm\Framework\Foundation\Application;
Here is an example of how you can override. You can use the following filter
fluentform/notifying_async_ when developing the integration it will make debugging easier.
public function __construct(Application $application)
{
    parent::__construct(
        $application,
        'MyAwesomeIntegration',                           // title
        'myIntegrationKey',                               // integration key
        'my_integration_details',                         // option key
        'my_integration_feed',                            // settings key
        11                                                // priority
    );

    $this->description = '';                              // Integration details

    $this->logo = '/my-integration-image-file-path.png';  // Integration Logo
    $this->registerAdminHooks();                          // Internal Functions

//  add_filter("fluentform/notifying_async_.$this->integrationKey", '__return_false');
}
2
3
4
5
6
7
8
9
10
11
12
13
14
15
16
17
18
# addActiveNotificationType($types)
Source: fluentform/app/Http/Controllers/IntegrationManagerController.php (line 137)
# addGlobalMenu($setting)
Source: fluentform/app/Http/Controllers/IntegrationManagerController.php (line 120)
# addNotificationType($types)
Source: fluentform/app/Http/Controllers/IntegrationManagerController.php (line 131)
# fluentform/save_integration_value_{integrationKey}
Filter hook for validating integration settings.
add_filter('fluentform/save_integration_value_' . $this->integrationKey, [$this, 'yourValidationMethodBeforeSave'], 10, 3);
Example of a validation:
public function yourValidationMethodBeforeSave($settings, $integrationId, $formId)
{
    try {
        $error = "";                                   // check your conditions
        if ($error){
            throw new \Exception('Error message ');   // throw error
        }
    } catch (\Exception $e) {
        wp_send_json_error([
            'message' => $e->getMessage(),
            'status' => false
        ], 400);
    }

    return $settings;
}
2
3
4
5
6
7
8
9
10
11
12
13
14
15
16
# getApiSettings()
Source: fluentform/app/Http/Controllers/IntegrationManagerController.php (line 216)
# getGlobalFields()
This method will need to return the settings data format for the integration API connection. You have to keep the structure as same as the example. This setting will store the API key & additional required data to connect with your Integration API.
Here is an example of the data format.
[
    'logo'             => $this->logo,                                         // Logo Path which was set in constructor
    'menu_title'       => __('Integration Settings', 'fluentform'),            // Integration Settings Title
    'menu_description' => __('Description', 'fluentform'),                     // Integration Settings Details
    'valid_message'    => __('Your API Key is valid', 'fluentform'),           // Valid API Message
    'invalid_message'  => __('Your API Key is not valid', 'fluentform'),       // Invalid API Message
    'save_button_text' => __('Save Settings', 'fluentform'),                   // Settings Save Button tTxt
    'fields'           => [
        'apiKey' => [
            'type'       => 'text',                                            // API key type
            'label_tips' => __("Enter your Integration API Key", 'fluentform'),// Additional help text
            'label'      => __('Integration API Key', 'fluentform'),           // Input Label
        ]
    ],
    'hide_on_valid'    => true,                                                // Settings Input will be hidden on valid
    'discard_settings' => [
        'section_description' => 'Your AwesomeIntegration is Activated',       // Discard Settings Page Description
        'button_text'         => 'Disconnect AwesomeIntegration',              // Discard Button Text
        'data'                => [
            'apiKey' => ''                                                     // Set API key to empty on discard
        ],
        'show_verify'         => true                                          // Show verification Option
    ]
];
2
3
4
5
6
7
8
9
10
11
12
13
14
15
16
17
18
19
20
21
22
23
24
# getGlobalSettings()
In this method, you will need to get your settings data using your option key and your default settings for the Settings. You will get one parameter here $settings.
Here is an example of the method:
 public function getGlobalSettings($settings)
    {
        $globalSettings = get_option($this->optionKey);
        if (!$globalSettings) {
            $globalSettings = [];
        }
        $defaults = [
            'apiKey' => '',
            'status' => ''
        ];

        return wp_parse_args($globalSettings, $defaults);
    }
2
3
4
5
6
7
8
9
10
11
12
13
# getIntegrationDefaults
This method will return your Integration feed settings default data format. You will get two parameters here $settings, $formId.
Here is an example of this method.
[
    'name'                   => '',
    'id'                     => '',
    'fieldEmailAddress'      => '',
    'custom_field_mappings'  => (object)[],
    'default_fields'         => (object)[],
    'conditionals'           => [
                   'conditions' => [],
                   'status'     => false,
                   'type'       => 'all'
    ],
    'enabled' => true
];
2
3
4
5
6
7
8
9
10
11
12
13
# getMergeFields()
In this method you will get three parameters $list, $listId, $formId.
This method is called after every select option change. When you have field depending on one another, you need to modify subfields based on a primary field you can use this method and return modified data based on one primary field.
For reference check Mailchimp integration (opens new window)
# getSettingsFields
This method will render input fields for the integration feed settings page, based on the returned input data format. You will get two parameters here $settings, $formId.
You can use the prebuilt input component to create your settings page, here is a documentation link (opens new window) where you can find the details list about these input component.
Required properties for the fields:
key: Settings Unique Keylabel: Settings Input Labelcomponent: Pass to prebuild input component.
[
    'fields' => [
        [
            'key'           => 'name',
            'label'         => 'Name',
            'required'      => true,
            'placeholder'   => 'Your Feed Name',
            'component'     => 'text'
        ],

        [
            'key'            => 'additional_fields',
            'label'          => 'Integration Fields',
            'sub_title'      => 'Please specify the data ',
            'required'       => true,
            'component'      => 'map_fields',
            'primary_fileds' => [
                [
                    'key'           => 'fieldEmailAddress',
                    'label'         => 'Email Address',
                    'required'      => true,
                    'input_options' => 'emails'
                ]
            ],
            'default_fields' => [
                [
                    'name'     => 'first_name',
                    'label'    => esc_html__('First Name', 'fluentformpro'),
                    'required' => false
                ],
                [
                    'name'     => 'last_name',
                    'label'    => esc_html__('Last Name', 'fluentformpro'),
                    'required' => false
                ],

            ]
        ],
        [
            'key'        => 'conditionals',
            'label'      => 'Conditional Logics',
            'tips'       => 'Push data to your Integration conditionally based on your submission values',
            'component'  => 'conditional_block'
        ],
        [
            'key'            => 'enabled',
            'label'          => 'Status',
            'component'      => 'checkbox-single',
            'checkbox_label' => 'Enable This feed'
        ]
    ],
    'integration_title' => $this->title
];
2
3
4
5
6
7
8
9
10
11
12
13
14
15
16
17
18
19
20
21
22
23
24
25
26
27
28
29
30
31
32
33
34
35
36
37
38
39
40
41
42
43
44
45
46
47
48
49
50
51
52
53
All your input field will be generated dynamically based on your provided data. You can later fetch this data using your input keys and use as you need in your integration after form submission. Here is an output screenshot of the above data format.
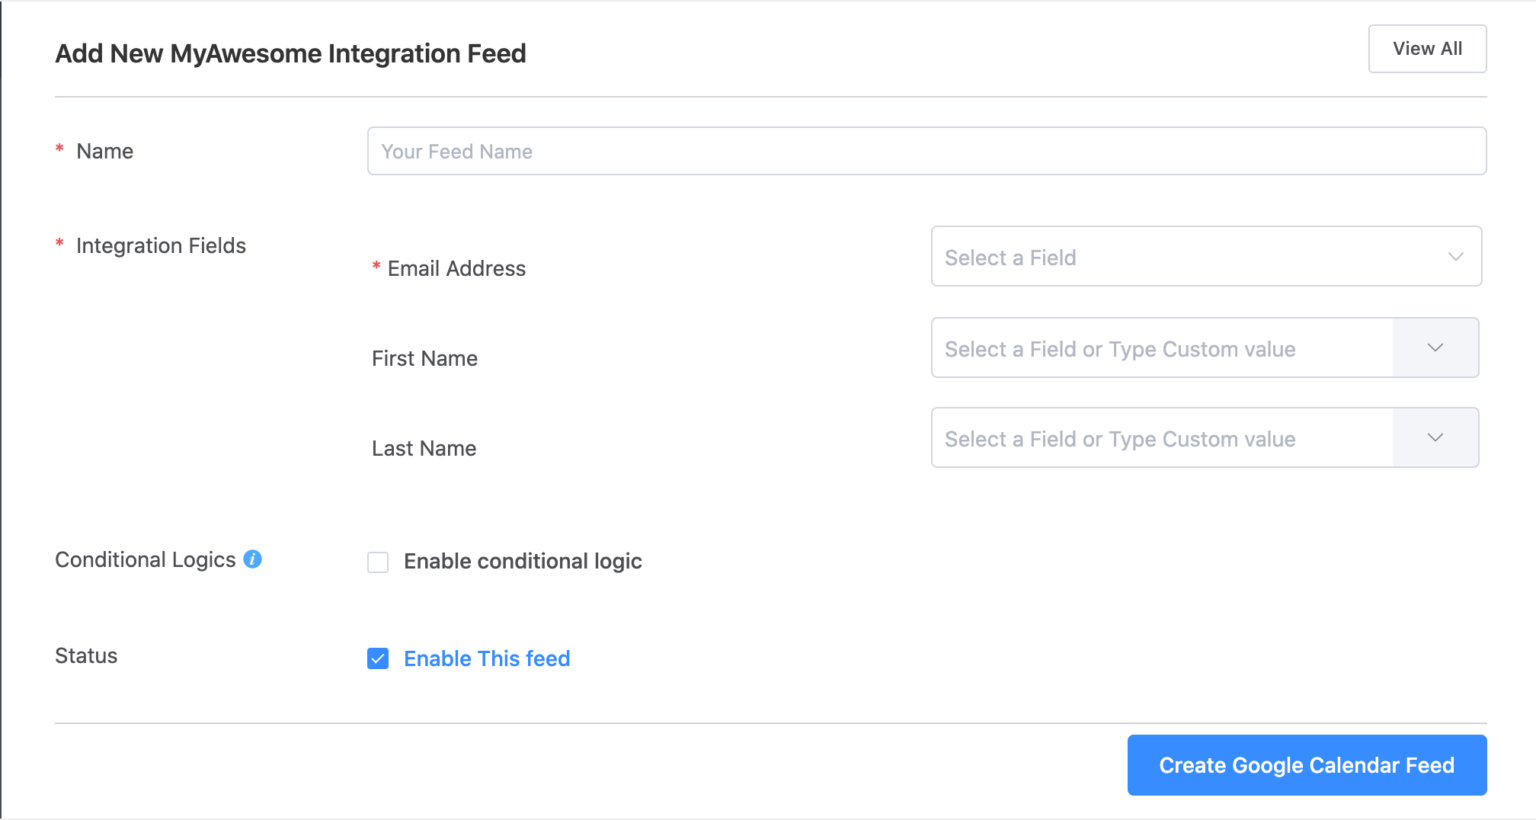 In the default settings [getIntegrationDefaults()](/api/classes/integration-manager-controller/#getintegrationdefaults) we gave a value `enabled` as true, that is why you can see that the field with this key `checkbox-single` checked which means it is true.
# isConfigured()
Source: fluentform/app/Http/Controllers/IntegrationManagerController.php (line 205)
# isEnabled()
Source: fluentform/app/Http/Controllers/IntegrationManagerController.php (line 211)
# notify()
This method will be called upon form submission, you will get four parameters $feed, $formData, $entry, $form. This is the most important method, here you will your necessary task upon form submission
Here is a filter that you can use to validate your settings.
# Further read
# prepareIntegrationFeed($setting, $feed, $formId)
Source: fluentform/app/Http/Controllers/IntegrationManagerController.php (line 164)
# pushIntegration()
Adding your integration into the form feeds. Here you will get two parameters $integrations, $formId,
Here is screenshot when the integration is pushed :
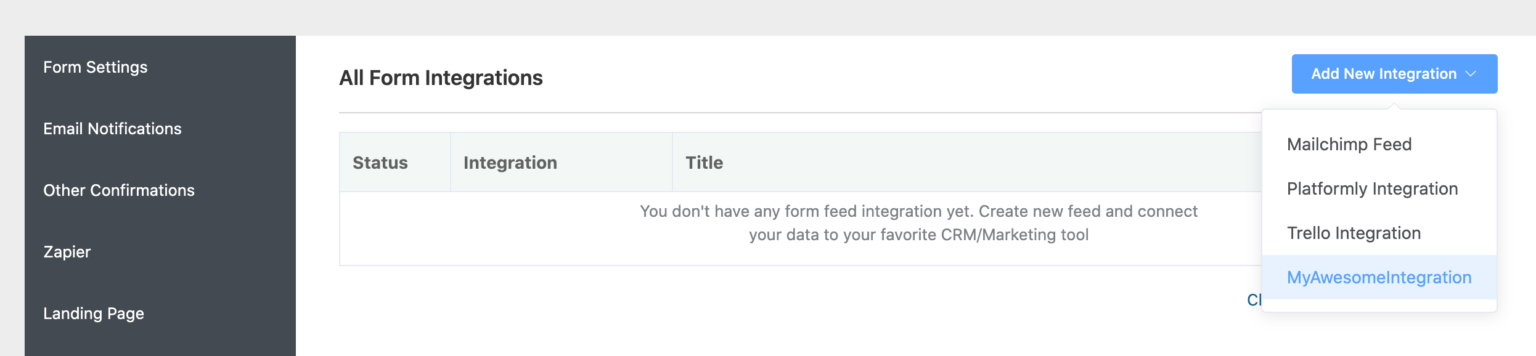
If the integration is configured it will push the integration into the form feed or else it will show a message to configure the API. The isConfigured() method, to check if the integration is configured is built in , you just need to call it.
public function pushIntegration($integrations, $formId)
{
    $integrations[$this->integrationKey] = [
        'title'                 => $this->title . ' Integration',
        'logo'                  => $this->logo,
        'is_active'             => $this->isConfigured(),
        'configure_title'       => 'Configuration required!',
        'global_configure_url'  => admin_url('admin.php?page=fluent_forms_settings#{your settings page url}'),
        'configure_message'     => 'MyAwesomeIntegration is not configured yet! Please configure your API first',
        'configure_button_text' => 'Set MyAwesomeIntegration API'
    ];
    return $integrations;
}
2
3
4
5
6
7
8
9
10
11
12
13
# registerAdminHooks()
Source: fluentform/app/Http/Controllers/IntegrationManagerController.php (line 54)
# registerNotificationHooks()
Source: fluentform/app/Http/Controllers/IntegrationManagerController.php (line 106)
# saveGlobalSettings()
Here you will get the settings data after user submission, and you can use the data connect with your API or do your required task. Then save the data or return error using your own validation.
For example :
public function saveGlobalSettings($settings)
    {
        if (!$settings['apiKey']) {
            $mySettings = [
                'apiKey' => '',
                'status' => false
            ];

            update_option($this->optionKey, $mySettings, 'no');
            wp_send_json_success([
                'message' => __('Your settings has been updated and disconnected', 'fluentform'),
                'status'  => false
            ], 200);
        }

        // Verify API key
        try {

        // Connect with your api using the apiKey
        // Your code

        } catch (\Exception $exception) {
            wp_send_json_error([
                'message' => $exception->getMessage()
            ], 400);
        }

        // API key is verified now
        $settings = [
            'apiKey' => sanitize_text_field($settings['apiKey']),
            'status' => true
        ];

        // Update options with the key
        update_option($this->optionKey, $settings, 'no`');

        wp_send_json_success([
            'message' => __('Your MyAwesomeIntegration api key has been verified and successfully set', 'fluentform'),
            'status'  => true
        ], 200);
    }
2
3
4
5
6
7
8
9
10
11
12
13
14
15
16
17
18
19
20
21
22
23
24
25
26
27
28
29
30
31
32
33
34
35
36
37
38
39
40
41
After you have successfully completed this step along with the previous methods, your integration will appear int the fluent form modules list.
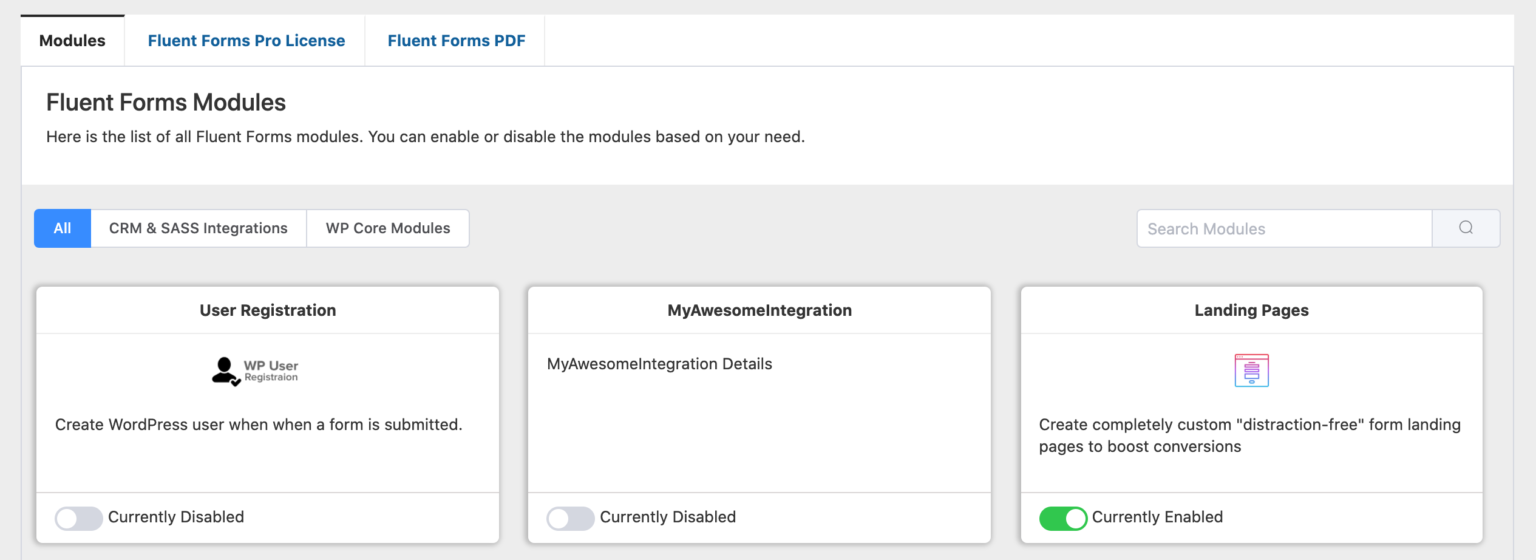
After you enable your new integration, you can go to the integration settings page where settings will be displayed according to your global field settings from getGlobalFields.
After the integration is up and running the integration needs to be pushed in the form feed, so a user can use this in his form. Following method will achieve this.
# setFeedAttributes($feed, $formId)
Source: fluentform/app/Http/Controllers/IntegrationManagerController.php (line 198)
# setMetaKey($data)
Source: fluentform/app/Http/Controllers/IntegrationManagerController.php (line 158)