
# Submission Lifecycle
Submission LifecycleIn this article we will cover how Fluent Forms submission Life-cycle happens under the hood. From submit button click to get confirmation message.
If you are an advanced user open the file fluentform/app/Http/Controllers/SubmissionHandlerController.php file and check submit() method to see the full implementation.
# Server Side Lifecycle
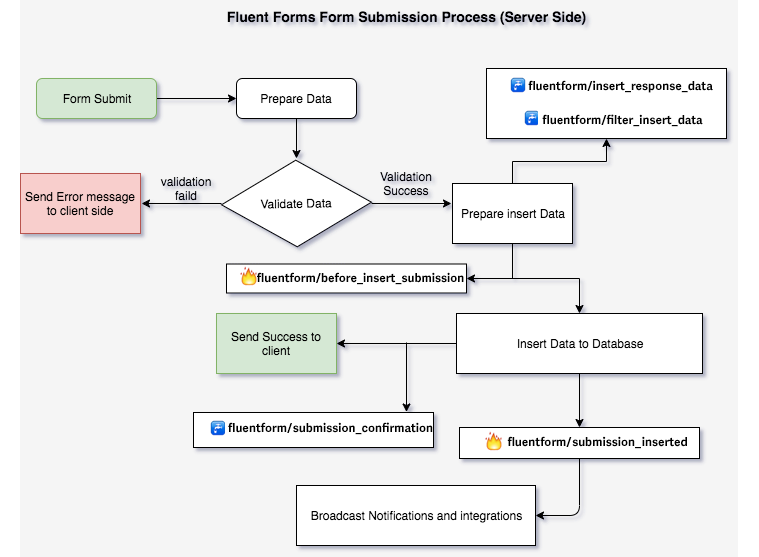
The following steps completed one by one
- Prepare the submitted the data
- Validate the data
- Prepare insert data
- Insert the data & initiate integrations and notifications
- Send response to browser as JSON response
# Step 1: Preparing the Data
In this step, Fluent Forms set up the form data, available inputs and submitted data from the browser. No major hooks fired in this step.
// Parse the url encoded data from the request object.
parse_str($this->request->get('data'), $data);

// Merge it back again to the request object.
$this->request->merge(['data' => $data]);

// Get form id to identify
$formId = intval($this->request->get('form_id'));

// Move submission handle service to handle submission
$response = $submissionHandlerService->handleSubmission($data, $formId);

// Move prepare handler to preparer data
$this->prepareHandler($formId, $formDataRaw);

// Parse the form and get the flat inputs with validations.
$this->fields = FormFieldsParser::getInputs($this->form, ['rules', 'raw']);

// Sanitize the data properly.
$this->formData = fluentFormSanitizer($formDataRaw, null, $this->fields);
2
3
4
5
6
7
8
9
10
11
12
13
14
15
16
17
18
19
20
# Step 2: Validate the data
In this step, Fluent Forms validate the submitted the data. If there has any error or validation failed then it send error response to client with in details errors object as JSON.
// Move validation handler to validate submitted data
$insertData = $this->handleValidation();

private function handleValidation()
{
    /*
    * Move validation service to handle validate submission
    */
    $this->validationService->validateSubmission($this->fields, $this->formData);

    // Prevent the malicious attacks
    $this->preventMaliciousAttacks();

    // Validate the form restrictions
    $this->validateRestrictions($fields);

    // Validate the form nonce. By default, it does not verify as many people use caching
    $this->validateNonce();

    // If captcha enabled then it verify it.
    $this->validateReCaptcha();
    $this->validateHCaptcha();
    $this->validateTurnstile();

    // Validate the required fields and offer each element to do their own validation.
    // Please check the source code to get elements level validation filter hook.
}
2
3
4
5
6
7
8
9
10
11
12
13
14
15
16
17
18
19
20
21
22
23
24
25
26
27
# Step 3: Prepare insert data
In this step Fluent Forms prepare the data to insert in the database. You can use the following hooks to alter/format the data as per your need.
fluentform/insert_response_data-> Use this filter hook for modify or format the actual submitted data from client.fluentform/filter_insert_data-> This filter hook is available just before a submission inserted into the database. The full entry, you don’t need to use this for almost 99% cases.
Please check the corresponding filter hook doc for more information and their structure.
# Step 4: Insert the data
In this step Fluent Forms provide action hook before insert data, insert the data and as well as after submission hook. It’s an important hook for developers to do extended validations and post custom integrations.
Before Insert Action Hook: fluentform/before_insert_submission
After Insert Action Hook: fluentform/submission_inserted
If you want to do extended validation please use the fluentform/before_insert_submission hook.
Check the corresponding hook documentation for more details.
# Step 5: Send response
This is the final step as everything is done and all the integrations and notifications being processed. Fluent Forms finds the appropriate confirmation and send response accordingly. You can use fluentform/submission_confirmation to alter the confirmation programatically.
# Server Side Hooks List for Submission
The hooks are fired as bellow (Step by Step)
- fluentform/insert_response_data
- fluentform/filter_insert_data
- fluentform/before_insert_submission
- fluentform/submission_inserted
- fluentform/submission_confirmation
- fluentform/before_submission_confirmation
Check the Submission Specific Hooks documentation for more details.
# Client Side Submission Lifecycle
When you click the submit button the following steps completed as step by step
- Validate the data
- If validation OK go to step 2
- If validation failed, Stop and show the error messages
- Prepare form data
- Add loading icon to submit button
- Make the
Restcall to server and wait for the server response- If response success then go to step 5
- If response as failed, stop and trigger jQuery
fluentform_submission_failedevent to the jquery form object with response
- Trigger jQuery event
fluentform_submission_successin the$formjQuery object with response - Show success message and redirect the user if confirmation is set so.
- Remove submit button loading.
/**
* See full implementation on `fluentform/resources/assets/public/form-submission.js`
*
**/
try {
var $inputs = $theForm
.find(':input').filter(function (i, el) {
return !$(el).closest('.has-conditions').hasClass('ff_excluded');
});
validate($inputs);
var formData = {
data: $inputs.serialize(),
// action: 'fluentform_submit',
form_id: $theForm.data('form_id')
};
let hasFiles = false;
$.each($theForm.find('[type=file]'), function (index, fileInput) {
var params = {}, fileInputName = fileInput.name + '[]';
params[fileInputName] = [];
$(fileInput)
.closest('div')
.find('.ff-uploaded-list')
.find('.ff-upload-preview[data-src]')
.each(function (i, div) {
params[fileInputName][i] = $(this).data('src');
});
$.each(params, function (k, v) {
if (v.length) {
var obj = {};
obj[k] = v;
formData['data'] += '&' + $.param(obj);
hasFiles = true;
}
});
});
// check if file is uploading
if ($theForm.find('.ff_uploading').length) {
let errorHtml = $('<div/>', {
'class': 'error text-danger'
});
let cross = $('<span/>', {
class: 'error-clear',
html: '×',
click: (e) => $(formSelector + '_errors').html('')
});
let text = $('<span/>', {
class: 'error-text',
text: 'File upload in progress. Please wait...'
});
return $(formSelector + '_errors').html(errorHtml.append(text, cross)).show();
}
// Init reCaptcha if available.
if ($theForm.find('.ff-el-recaptcha.g-recaptcha').length) {
let recaptchaId = getRecaptchaClientId(formData.form_id);
if (recaptchaId) {
formData['data'] += '&' + $.param({
'g-recaptcha-response': grecaptcha.getResponse(recaptchaId)
});
}
}
// Init hCaptcha if available.
if ($theForm.find('.ff-el-hcaptcha.h-captcha').length) {
let hcaptchaId = getHcaptchaClientId(formData.form_id);
if (hcaptchaId) {
formData['data'] += '&' + $.param({
'h-captcha-response': hcaptcha.getResponse(hcaptchaId)
});
}
}
// Init turnstile if available.
if ($theForm.find('.ff-el-turnstile.cf-turnstile').length) {
let turnstileId = getTurnstileClientId(formData.form_id);
if (turnstileId) {
formData['data'] += '&' + $.param({
'cf-turnstile-response': turnstileId.getResponse(turnstileId)
});
}
}
$(formSelector + '_success').remove();
$(formSelector + '_errors').html('');
$theForm.find('.error').html('');
$theForm.parent().find('.ff-errors-in-stack').hide();
fireGlobalBeforeSendCallbacks($theForm, formData).then(() => {
showFormSubmissionProgress($theForm);
sendData($theForm, formData);
});
} catch (e) {
if (!(e instanceof ffValidationError)) {
throw e;
}
showErrorMessages(e.messages);
}
var sendData = function ($theForm, formData) {
function addParameterToURL(param) {
let _url = fluentFormVars.ajaxUrl;
_url += (_url.split('?')[1] ? '&' : '?') + param;
return _url;
}
const ajaxRequestUrl = addParameterToURL('t=' + Date.now());
if (this.isSending) {
return;
}
var that = this;
this.isSending = true;
$.post(ajaxRequestUrl, formData)
.then(function (res) {
if (!res || !res.data || !res.data.result) {
// This is an error
$theForm.trigger('fluentform_submission_failed', {
form: $theForm,
response: res
});
showErrorMessages(res);
return;
}
if (res.data.append_data) {
addHiddenData(res.data.append_data);
}
if (res.data.nextAction) {
$theForm.trigger('fluentform_next_action_' + res.data.nextAction, {
form: $theForm,
response: res
});
return;
}
$theForm.triggerHandler('fluentform_submission_success', {
form: $theForm,
config: form,
response: res
});
jQuery(document.body).trigger('fluentform_submission_success', {
form: $theForm,
config: form,
response: res
});
if ('redirectUrl' in res.data.result) {
if (res.data.result.message) {
$('<div/>', {
'id': formId + '_success',
'class': 'ff-message-success'
})
.html(res.data.result.message)
.insertAfter($theForm);
$theForm.find('.ff-el-is-error').removeClass('ff-el-is-error');
}
location.href = res.data.result.redirectUrl;
return;
} else {
const successMsgId = formId + '_success';
const successMsgSelector = '#' + successMsgId;
if ($(successMsgSelector).length) {
$(successMsgSelector).slideUp('fast');
}
$('<div/>', {
'id': successMsgId,
'class': 'ff-message-success'
})
.html(res.data.result.message)
.insertAfter($theForm);
$theForm.find('.ff-el-is-error').removeClass('ff-el-is-error');
if (res.data.result.action == 'hide_form') {
$theForm.hide().addClass('ff_force_hide');
$theForm[0].reset();
} else {
jQuery(document.body).trigger('fluentform_reset', [$theForm, form]);
$theForm[0].reset();
}
// Scroll to success msg if not in viewport
const successMsg = $(successMsgSelector);
if (successMsg.length && !isElementInViewport(successMsg[0])) {
$('html, body').animate({
scrollTop: successMsg.offset().top - (!!$('#wpadminbar') ? 32 : 0) - 20
}, fluentFormVars.stepAnimationDuration);
}
}
})
.fail(function (res) {
$theForm.trigger('fluentform_submission_failed', {
form: $theForm,
response: res
});
if (!res || !res.responseJSON || !res.responseJSON || !res.responseJSON.errors) {
showErrorMessages(res.responseText);
return;
}
if (res.responseJSON.append_data) {
addHiddenData(res.responseJSON.append_data);
}
showErrorMessages(res.responseJSON.errors);
scrollToFirstError(350);
if ($theForm.find('.fluentform-step').length) {
var step = $theForm
.find('.error')
.not(':empty:first')
.closest('.fluentform-step');
if (step.length) {
let goBackToStep = step.index();
fireUpdateSlider(
goBackToStep, fluentFormVars.stepAnimationDuration, false
);
}
}
})
.always(function (res) {
that.isSending = false;
hideFormSubmissionProgress($theForm);
// reset reCaptcha if available.
if (window.grecaptcha) {
let reCaptchaId = getRecaptchaClientId(formData.form_id);
if (reCaptchaId) {
grecaptcha.reset(reCaptchaId);
}
}
if (window.hcaptcha) {
hcaptcha.reset(); //two recapthca on same page creates conflicts
}
if (window.turnstile) {
let turnstileId = getTurnstileClientId(formData.form_id);
if (turnstileId) {
turnstileId.reset(turnstileId);
}
}
});
}
2
3
4
5
6
7
8
9
10
11
12
13
14
15
16
17
18
19
20
21
22
23
24
25
26
27
28
29
30
31
32
33
34
35
36
37
38
39
40
41
42
43
44
45
46
47
48
49
50
51
52
53
54
55
56
57
58
59
60
61
62
63
64
65
66
67
68
69
70
71
72
73
74
75
76
77
78
79
80
81
82
83
84
85
86
87
88
89
90
91
92
93
94
95
96
97
98
99
100
101
102
103
104
105
106
107
108
109
110
111
112
113
114
115
116
117
118
119
120
121
122
123
124
125
126
127
128
129
130
131
132
133
134
135
136
137
138
139
140
141
142
143
144
145
146
147
148
149
150
151
152
153
154
155
156
157
158
159
160
161
162
163
164
165
166
167
168
169
170
171
172
173
174
175
176
177
178
179
180
181
182
183
184
185
186
187
188
189
190
191
192
193
194
195
196
197
198
199
200
201
202
203
204
205
206
207
208
209
210
211
212
213
214
215
216
217
218
219
220
221
222
223
224
225
226
227
228
229
230
231
232
233
234
235
236
237
238
239
240
241
242
243
244
245
246
247
248
249
250
251
252
253
254
255
256
257
258
259
260